How to view, analyze and export responses
If you are looking for a step by step guide on how to view, analyze, and export responses, you have come to the right place. In this tutorial, we will assume that there was already a form created and that there were multiple responses for that form. We will look at how Wispform can allow you visualize these responses.
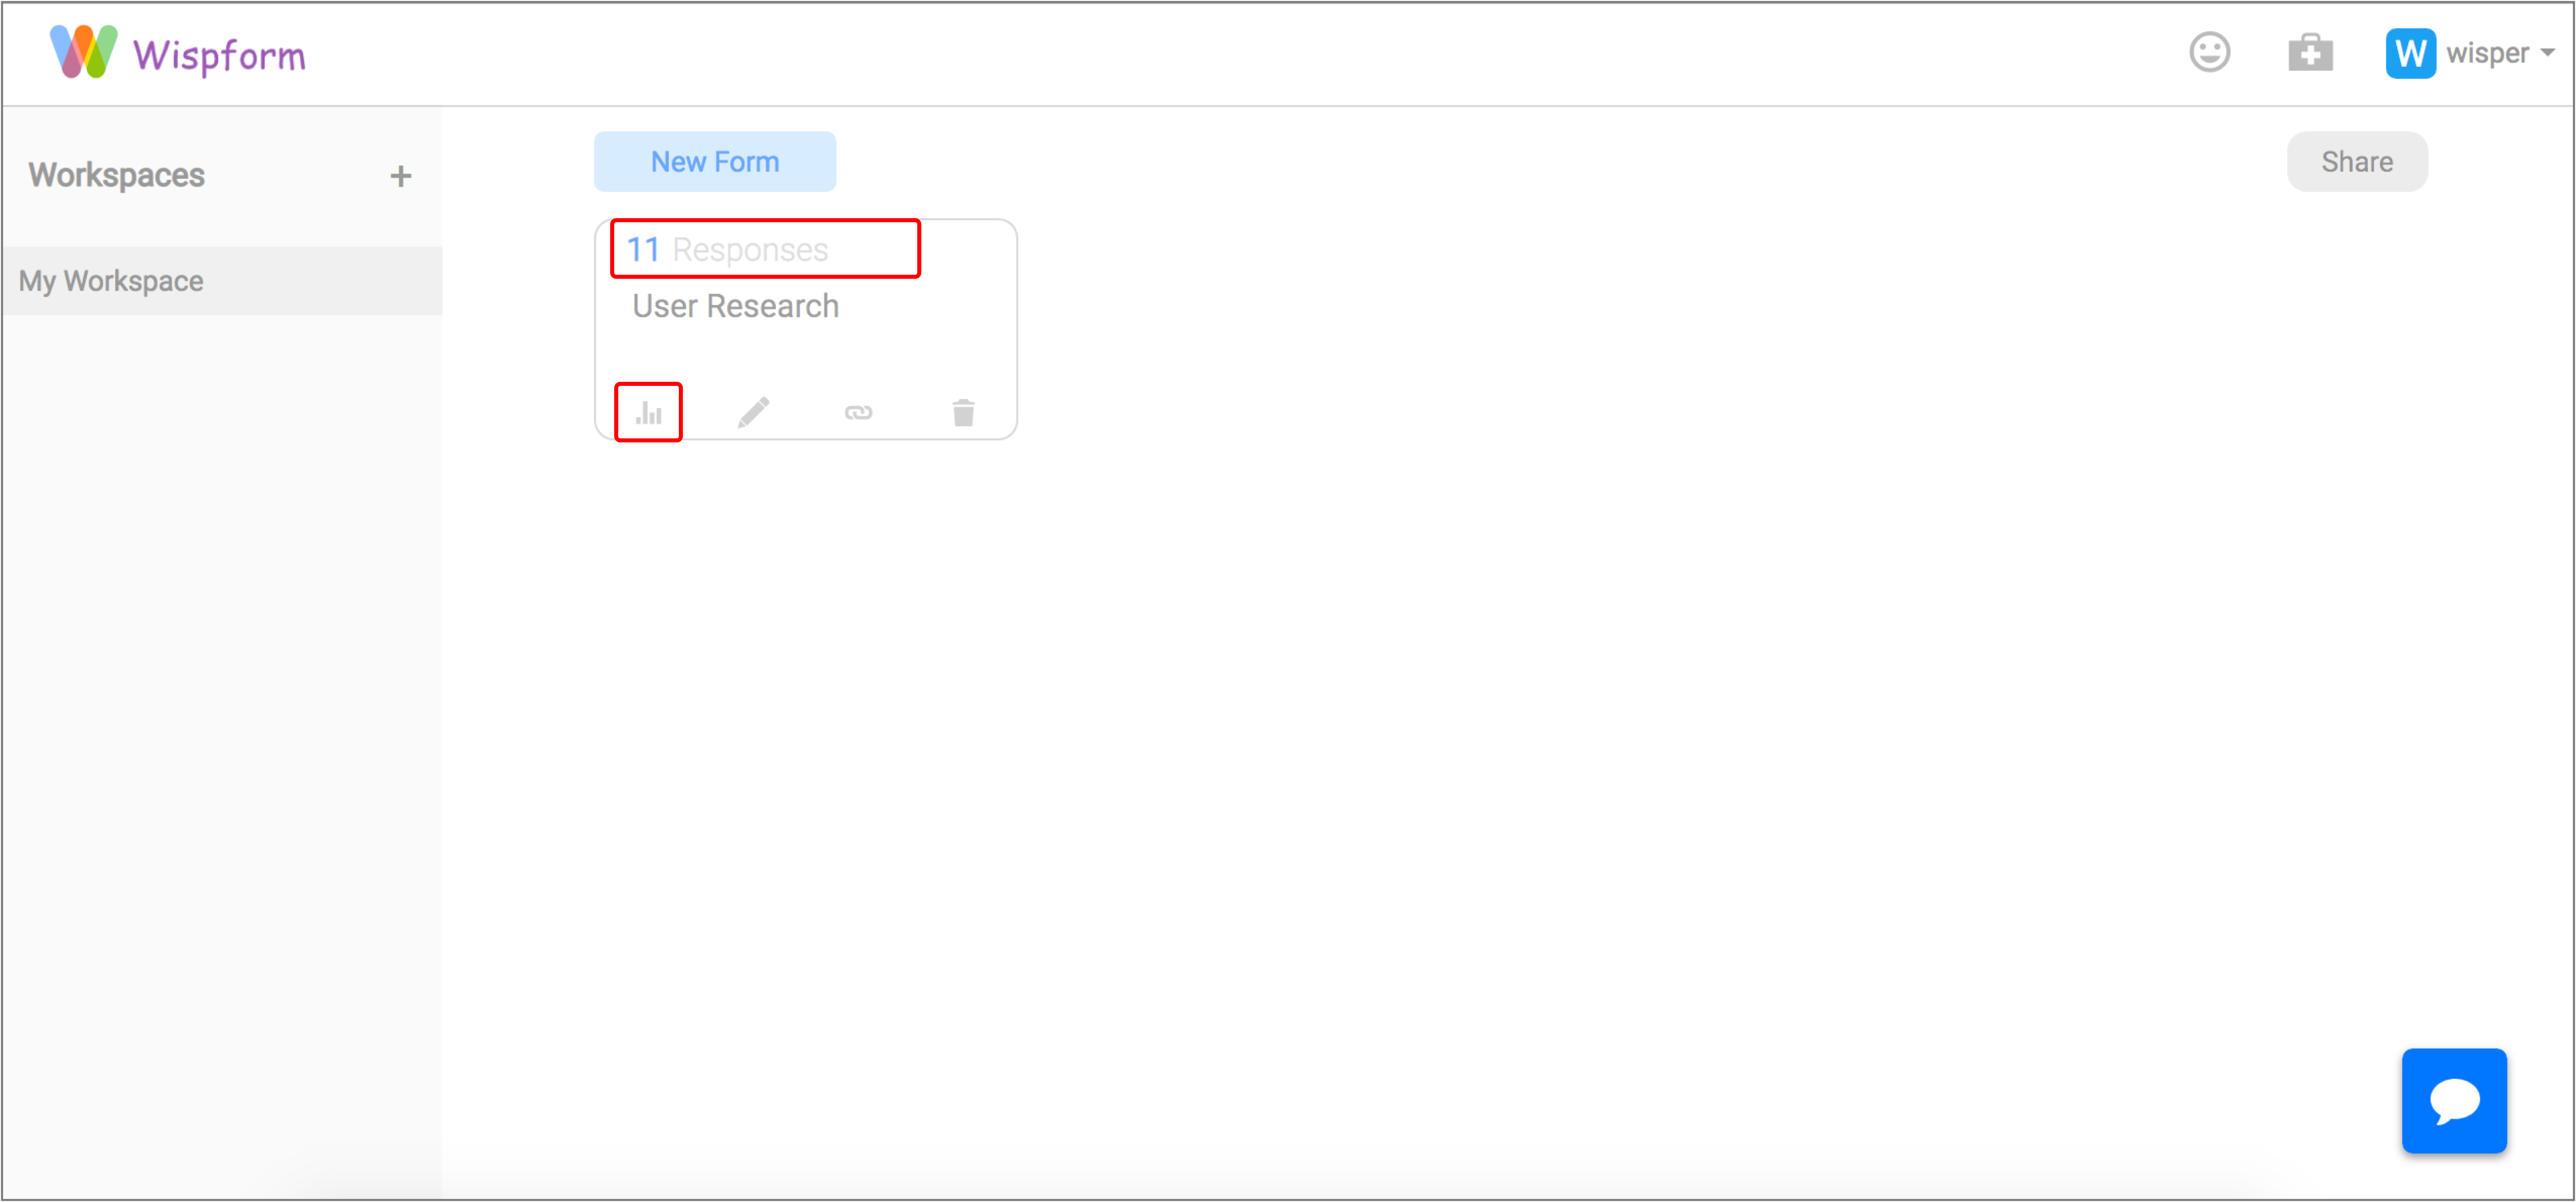
Step 1: Go to response page
Upon logging into the website, you will be able to see your forms and how many responses there are. In the diagram below, you can see that there are eleven responses for the user research form. Click on the first button to go to the response page for that form.
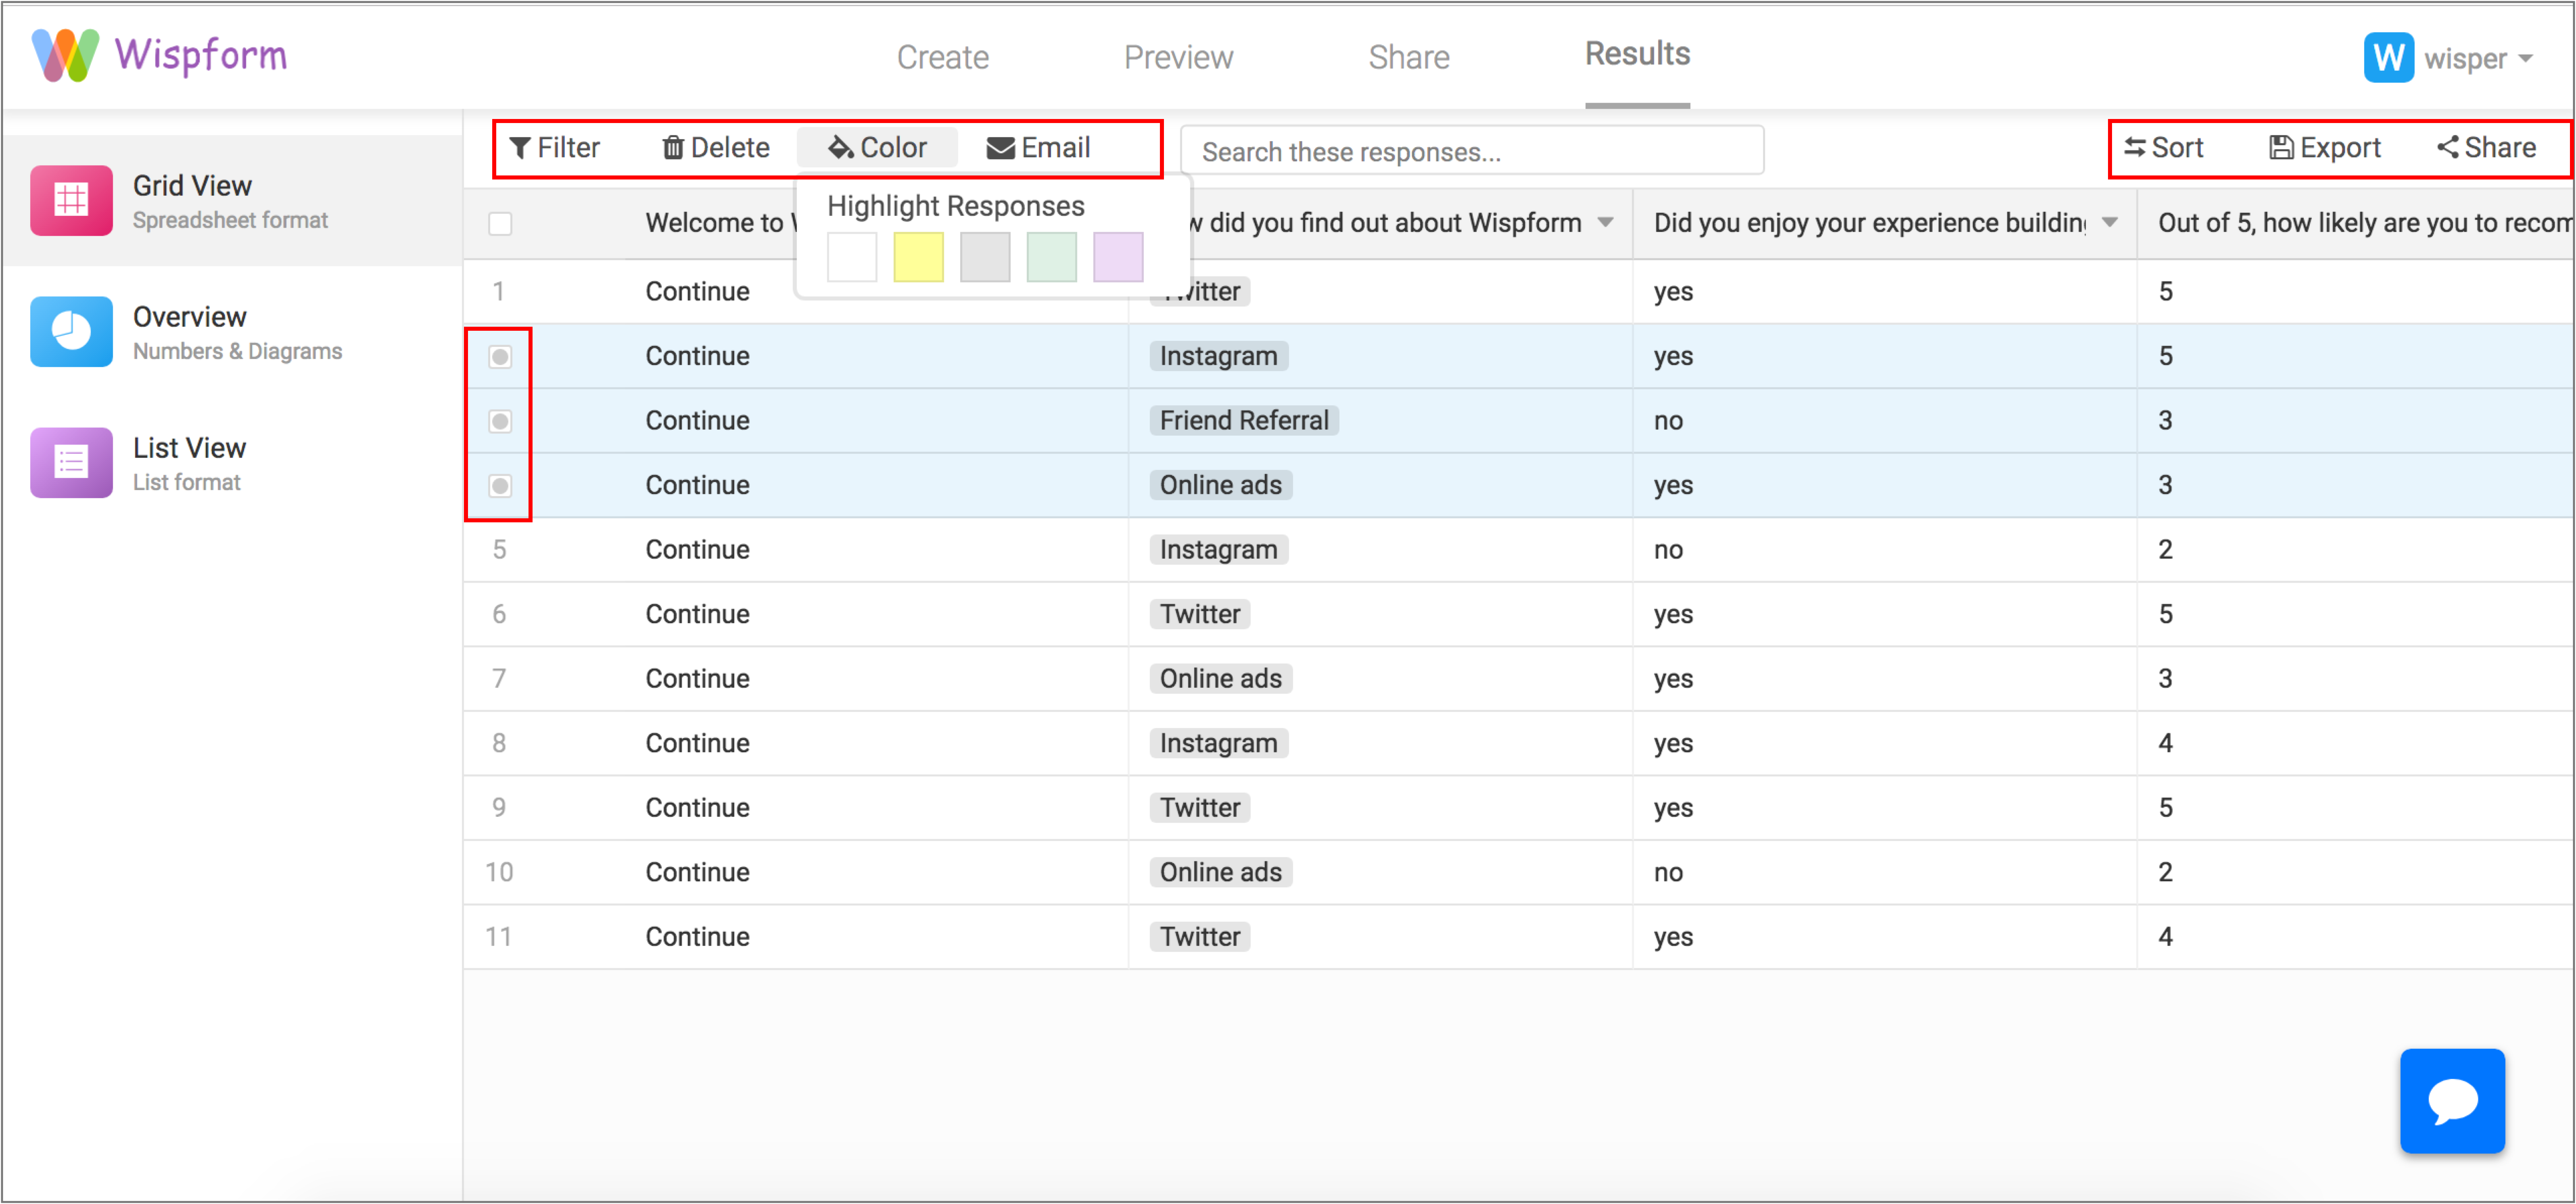
Step 2: View your responses in a spreadsheet view
The first response page that you will land on is the spreadsheet view. You will be able to see your questions in the top row and each row below that represents a unique response. If the response for a particular question is too long, you can increase the width of each column by holding down and dragging the top cell of that particular column.

Step 3: Perform actions in the spreadsheet view
In the toolbox near the top, there are a list of actions that you can perform. These include filter, delete, color and email on the left hand side. You can filter out particular responses based on the answer for each question. If you select the rows by clicking the empty square to the left of each row, you can delete the response on add a color to the response. Coloring the response is a great way for you to organize your long list of responses. If you are on the premium tier, you can also use the email function to send a message to any responder who have filled in their email using the email question type. On the right, you will find the sort, export, and share function. Unfortunately, we do not yet support share.
Step 4: Export as PDF (Premium Feature)
If you are on the paid plan, you can will be able to select a single or multiple response and download them in a pdf format. This will not only help you share your responses with other people but also help you clearly view responses that are a little longer to read in the grid view.

NOTE: Forms with 1000+ Responses
Wispform supports at least 1000 responses per month on any of the paid plan. If you have a lot of responses, we will paginate your response to 100 per page in the grid view. If you want to export your responses into CSV or Excel, you will click the export button and wait 1-2 minutes before coming back and clicking the refresh button to get the download link. For forms with tens of thousands of responses, the overview page can take up to 1-2 minutes to load.
Step 5: View your responses in summary view
On the left, you can navigate to the summary page for your responses. We are still working on the list view so there will be nothing if you try to click on it. Inside the summary page, you can see the metrics for number of responses, number of page views for the form, completion rate and the average time for a responder to complete the response.

Step 6: View summary diagrams
For questions of the type multichoice, yes/no, dropdown, and rating, you can see a summary of the responses in the diagrams below the summary metrics. These can be helpful if you want to quickly tally up the responses for reporting purpose.
 Thanks for patiently going through this tutorial. If you are facing any issue or have any question, feel free to use the chat box on the bottom right corner of this page. We are always happy to hear from you!
Related Articles
Upon logging into the website, you will be able to see your forms and how many responses there are. In the diagram below, you can see that there are eleven responses for the user research form. Click on the first button to go to the response page for that form.
Step 2: View your responses in a spreadsheet view
The first response page that you will land on is the spreadsheet view. You will be able to see your questions in the top row and each row below that represents a unique response. If the response for a particular question is too long, you can increase the width of each column by holding down and dragging the top cell of that particular column.
Step 3: Perform actions in the spreadsheet view
In the toolbox near the top, there are a list of actions that you can perform. These include filter, delete, color and email on the left hand side. You can filter out particular responses based on the answer for each question. If you select the rows by clicking the empty square to the left of each row, you can delete the response on add a color to the response. Coloring the response is a great way for you to organize your long list of responses. If you are on the premium tier, you can also use the email function to send a message to any responder who have filled in their email using the email question type. On the right, you will find the sort, export, and share function. Unfortunately, we do not yet support share.
Step 4: Export as PDF (Premium Feature)
If you are on the paid plan, you can will be able to select a single or multiple response and download them in a pdf format. This will not only help you share your responses with other people but also help you clearly view responses that are a little longer to read in the grid view.
NOTE: Forms with 1000+ Responses
Wispform supports at least 1000 responses per month on any of the paid plan. If you have a lot of responses, we will paginate your response to 100 per page in the grid view. If you want to export your responses into CSV or Excel, you will click the export button and wait 1-2 minutes before coming back and clicking the refresh button to get the download link. For forms with tens of thousands of responses, the overview page can take up to 1-2 minutes to load.
Step 5: View your responses in summary view
On the left, you can navigate to the summary page for your responses. We are still working on the list view so there will be nothing if you try to click on it. Inside the summary page, you can see the metrics for number of responses, number of page views for the form, completion rate and the average time for a responder to complete the response.
Step 6: View summary diagrams
For questions of the type multichoice, yes/no, dropdown, and rating, you can see a summary of the responses in the diagrams below the summary metrics. These can be helpful if you want to quickly tally up the responses for reporting purpose.
Thanks for patiently going through this tutorial. If you are facing any issue or have any question, feel free to use the chat box on the bottom right corner of this page. We are always happy to hear from you!
Related Articles
For questions of the type multichoice, yes/no, dropdown, and rating, you can see a summary of the responses in the diagrams below the summary metrics. These can be helpful if you want to quickly tally up the responses for reporting purpose.
Thanks for patiently going through this tutorial. If you are facing any issue or have any question, feel free to use the chat box on the bottom right corner of this page. We are always happy to hear from you!